|
PartyPreOrders Help Manual
3
How to Create Your First Menu – Part 2 -
Creating an Online Pre-Order Menu
a.
Now you are ready to create your first online menu… So click
on ‘Menus’ on the left had side and you will see the following empty screen:
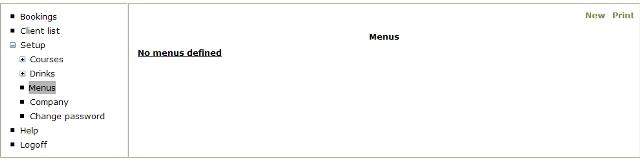
[Image No.4]
a.
- Click on ‘New’ at the top right to proceed to the next screen::
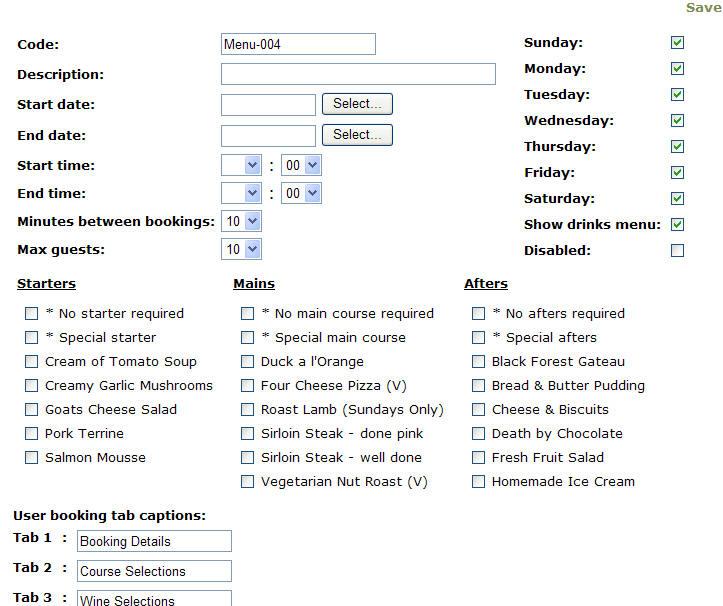
[Image No.5]
a.
CODE - First of all, give it a single word meaningful & individual
‘Code’ – use underscores or hyphens if necessary, eg “easter-2009” or
“xmas_party_2008-1”. These codes will eventually make up the online address
of your pre-order menu.
b.
DESCRIPTION – Put any meaningful friendly description in a few words
for your menu, eg ”Easter Sunday Lunch”.
c.
START DATE & END DATE – To enter dates in the correct database
format, click on the calendar boxes and select the start and end dates when
this menu will be available. If it is for a single day then obviously select
the same date twice.
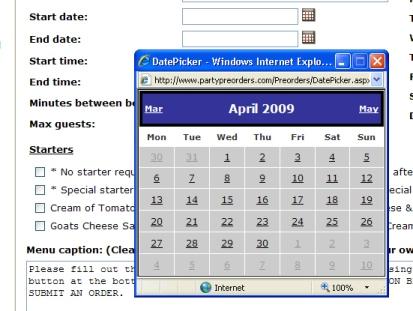
[Image No.6]
d.
DAYS OF WEEK
–
Choose which days of the week your menu will be available in between the
start and end dates above. [This setting is not applicable if you have only
chosen a single date for the menu above.]
e.
DISABLED
– when this option is chosen the menu will eventually be produced, but not
available online until taken out of the box by editing the form at a later
time. It is recommended that you leave this blank.
f.
START TIME & END
TIME
– Choose you start and end times for the menu.
g.
MINUTES BETWEEN
BOOKINGS
– Select the time period in minutes between bookings.
h.
MAX GUESTS
– Choose the largest table size of covers which you will be catering for.
[N.B. Should you need to increase the default size, then this can be changed
with the ‘Company’ settings of your control panel.]
i.
STARTERS, MAINS
& AFTERS
– Select the necessary menu options in the adjacent tick boxes, including
the suggested ‘No Course Required’ & ‘Special Course’ options.
j.
MENU CAPTION
– This option depends on whether you are eventually going to use the online
pre-order menu as a stand alone webpage or for advanced web-masters &
programmers, embed the menu within an I-Frame on your own website. [See our
I-Frame help for more information.]
Assuming you are going to use for the simple option of a stand alone
pre-order webpage, then the default description will give instructions to
your customers of how to fill out their online pre-order form. [You can
either edit the default caption in the ‘Company’s section of you control
panel or change the specific instruction for each individual menu it the
‘Caption’ box. ]
Finally ‘SAVE’ the changes to your new pre-order menu, by clicking the
‘Save’ link at the top right hand side of the form; otherwise your changes
will be lost! Your new menu’s data (after saving) should look something
like this:
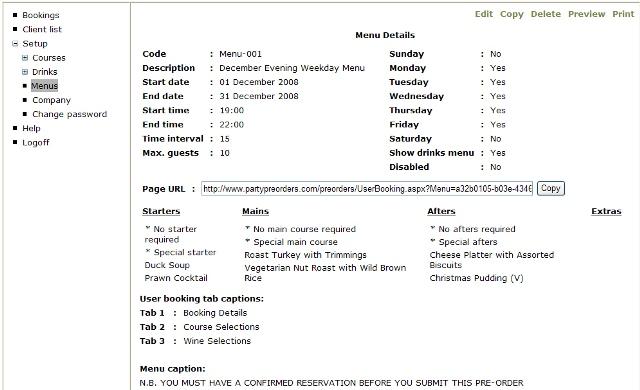
[Image No.8]
THEN ITS TIME TO GO TEST
|